
Arthur Queffelec
Friday, February 13, 2026 | 10 minutes
Running ONNX Models in Flutter
Introduction
Hi there!
Lately, I’ve been seeing a wave of articles and posts praising lightning-fast GPU inference. And don’t get me wrong, GPUs are great, and I absolutely appreciate a good speed boost as much as the next person. But I also believe a huge chunk of real-world use cases simply don’t need massive models or blazing inference speeds. In fact, for many apps, the ability to run small models fully offline, on the device that’s already in your pocket, provides far more practical value, especially when it comes to privacy.
I’ve been tinkering with Flutter for quite a while now, and naturally, I started wondering: How far can I push on-device inference? Can I run lightweight ML models directly in a Flutter app… without any server, without GPU, and ideally without pain?
In this article, I want to share the journey I took to run ONNX models offline in Flutter using an ONNX Runtime plugin (flutter_onnxruntime). I’ll show what worked, what didn’t, and what I learned along the way. If you want to do something similar, hopefully this saves you some time, and possibly some sanity.
ONNX Runtime for Flutter
Why ONNX Runtime?
The ONNX Runtime documentation introduces itself like this:
“ONNX Runtime is a cross-platform machine-learning model accelerator, with a flexible interface to integrate hardware-specific libraries. ONNX Runtime can be used with models from PyTorch, TensorFlow/Keras, TFLite, scikit-learn, and other frameworks.”
That’s pretty much all I needed to hear.
I don’t mind using different frameworks during training, experimenting is part of the fun, but when it comes to deployment, juggling multiple toolchains is not. Being able to train in anything and then export to ONNX for deployment is a huge win. It means I can keep experimenting freely, yet still ship a single portable artifact.
Now, Dart has great FFI support and ONNX Runtime ships a C library, so in theory I could wire it all together myself. But in practice… I prefer to stand on the shoulders of people who already did the hard work.
There are currently a least two ONNX Runtime plugins on pub.dev:
- onnxruntime which has been last update 22 month ago.
- flutter_onnxruntime which has been last update 5 days ago. (and depending on when you read this, maybe a few more 😊)
After looking through issues, examples, and overall maintenance, I landed on flutter_onnxruntime. It’s actively developed, has a clean API, supports both Android and iOS, and the documentation doesn’t require archeology skills to decipher. Good enough for me.
Running a Simple ONNX Model
Before going all-in with a huge model, I wanted to check that the plugin actually works. No point debugging tokenizer issues or tensor shapes if the runtime isn’t set up correctly.
The plugin includes a very straightforward sample: a simple ONNX model that adds two numbers together. Perfect. It’s tiny, predictable, and impossible to misunderstand. You give it A and B, it gives you their sum.
import 'package:flutter_onnxruntime/flutter_onnxruntime.dart';

// create inference session
final ort = OnnxRuntime();
final session = await ort.createSessionFromAsset('assets/models/addition_model.onnx');

// specify input with data and shape
final inputs = {
   'A': await OrtValue.fromList([1, 1, 1], [3]),
   'B': await OrtValue.fromList([2, 2, 2], [3])
}

// start the inference
final outputs = await session.run(inputs);

// print output data
print(await outputs['C']!.asList());
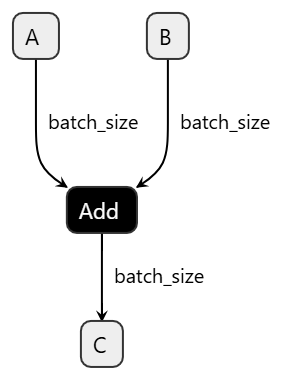
Alright, this all seems pretty straightforward. We create an inference session from an ONNX model bundled in our Flutter assets, prepare a couple of tensors with the correct data and shapes, run the inference, and voilà, we get output. For simple models like the addition example, it almost feels too easy.
But of course, that’s because the model itself is simple.
Once you step into the world of transformer-based models, the real challenge isn’t running the model, it’s feeding it data in exactly the way it expects. Input shapes, token IDs, segment IDs, attention masks… suddenly building the tensors becomes the hard part.
A Bigger Model
I think we now have a solid grasp on how to run a simple ONNX model. So let’s take things one step further and apply the same approach to a more complex model: bert_emotion, a BERT-based classifier for emotion detection. Unlike our tiny addition model, this one takes raw text as input and outputs a set of logits corresponding to different emotion categories.
{
  "architectures": [
    "BertForSequenceClassification"
  ],
  "attention_probs_dropout_prob": 0.1,
  "classifier_dropout": null,
  "hidden_act": "gelu",
  "hidden_dropout_prob": 0.1,
  "hidden_size": 256,
  "id2label": {
    "0": "sadness",
    ...
    "12": "sarcasm"
  },
  "initializer_range": 0.02,
  "intermediate_size": 1024,
  "label2id": {
      "sadness": 0,
      ...
      "sarcasm": 12
  },
  "layer_norm_eps": 1e-12,
  "max_position_embeddings": 512,
  "model_type": "bert",
  "num_attention_heads": 4,
  "num_hidden_layers": 4,
  "pad_token_id": 0,
  "position_embedding_type": "absolute",
  "problem_type": "single_label_classification",
  "torch_dtype": "float32",
  "transformers_version": "4.50.1",
  "type_vocab_size": 2,
  "use_cache": true,
  "vocab_size": 30522
}
From the model configuration, we can see that this is a BERT model designed for single-label classification across 13 emotion categories. The model expects tokenized text as input and returns logits for each of those emotion classes. Another important detail is the maximum sequence length of 512 tokens, which means our input needs to be correctly tokenized, padded, and shaped to match this requirement.
Converting the Model to ONNX Format
A trained eye will also notice that the configuration points to a Hugging Face Transformers checkpoint in safetensors format. So we first need to convert it. Fortunately, the Hugging Face Transformers library makes this conversion quite straightforward, and we can export the model to ONNX with just a few lines of Python.
from pathlib import Path
import torch
from transformers import AutoModelForSequenceClassification, AutoTokenizer

# Load the model and tokenizer
model = AutoModelForSequenceClassification.from_pretrained("bert-emotion", local_files_only=True)
tokenizer = AutoTokenizer.from_pretrained("bert-emotion", local_files_only=True)

# Set the model to evaluation mode
model.eval()

# Prepare a sample input for the model to easily determine the input shapes and data types
sample = tokenizer(
    "I feel great today!",
    return_tensors="pt",
    truncation=True,
    max_length=512,         # ensure we respect the model's max sequence length
    padding="max_length",
)

input_ids = sample["input_ids"]
attention_mask = sample["attention_mask"]
token_type_ids = sample.get("token_type_ids")

# Wrap the model to ensure it returns logits in a way that ONNX can understand
class BertEmotionOnnxWrapper(torch.nn.Module):
    def __init__(self, model: torch.nn.Module) -> None:
        super().__init__()
        self.model = model

    def forward(
        self,
        input_ids: torch.Tensor,
        attention_mask: torch.Tensor,
        token_type_ids: torch.Tensor,
    ) -> torch.Tensor:
        return self.model(
            input_ids=input_ids,
            attention_mask=attention_mask,
            token_type_ids=token_type_ids,
            return_dict=True,
        ).logits

# Export the model to ONNX format
wrapper = BertEmotionOnnxWrapper(model)

output_path = Path("bert-emotion/bert-emotion.onnx")
output_path.parent.mkdir(parents=True, exist_ok=True)

# Export the model to ONNX format with dynamic axes for batch size and sequence length
torch.onnx.export(
    wrapper,
    (input_ids, attention_mask, token_type_ids),
    output_path.as_posix(),
    input_names=["input_ids", "attention_mask", "token_type_ids"],
    output_names=["logits"],
    dynamic_axes={
        "input_ids": {0: "batch_size", 1: "sequence_length"},
        "attention_mask": {0: "batch_size", 1: "sequence_length"},
        "token_type_ids": {0: "batch_size", 1: "sequence_length"},
        "logits": {0: "batch_size"},
    },
    opset_version=17,
    do_constant_folding=True,
)

print(f"ONNX model exported to: {output_path}")
This script loads the bert_emotion model and its tokenizer, prepares a sample input to determine the input signature, wraps the model so it returns logits in a way ONNX can understand, and then exports everything to ONNX with dynamic axes for both batch size and sequence length.
The input_names and output_names parameters assign stable graph names inside the exported model. This matters because dynamic_axes refers to these names directly. In our case, axis 0 is marked as batch_size and axis 1 as sequence_length for all three inputs, allowing the model to handle varying batch sizes and token lengths at inference time. The logits output is dynamic only along axis 0, meaning the number of predictions scales with batch size.
Now let’s open the model in Netron and confirm that the input and output shapes look correct.
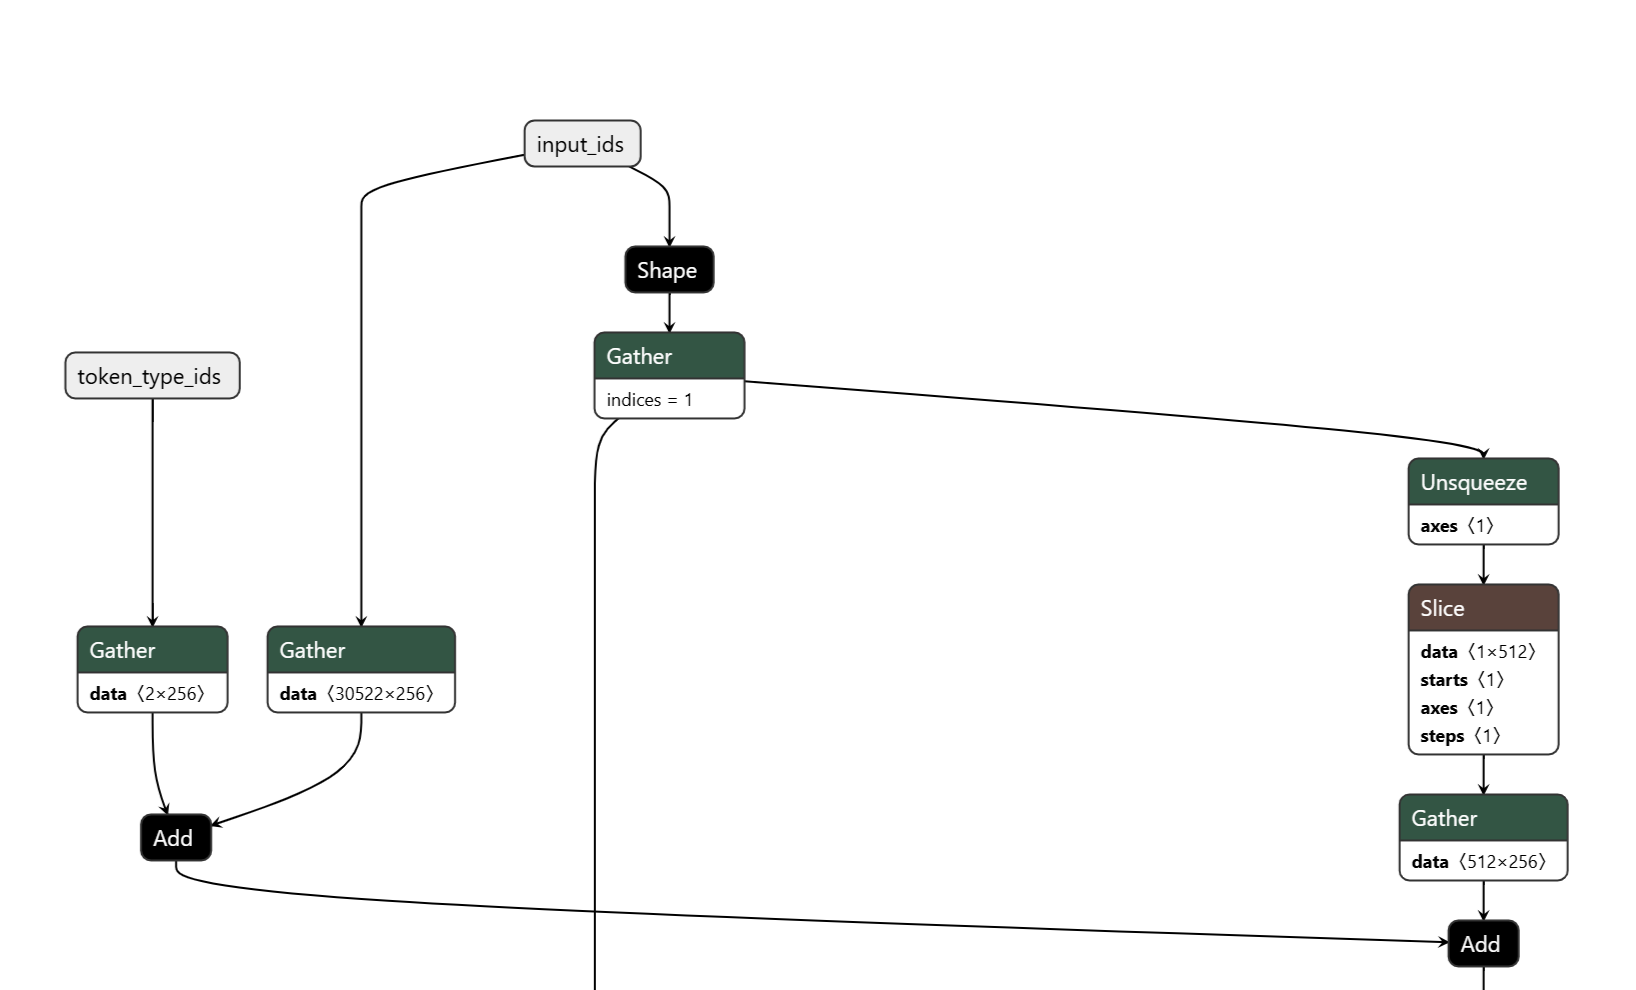
Inspecting the input nodes, we see exactly what we expect: the three input tensors (input_ids, attention_mask, token_type_ids), the vocabulary size of 30 522, and a maximum sequence length of 512.
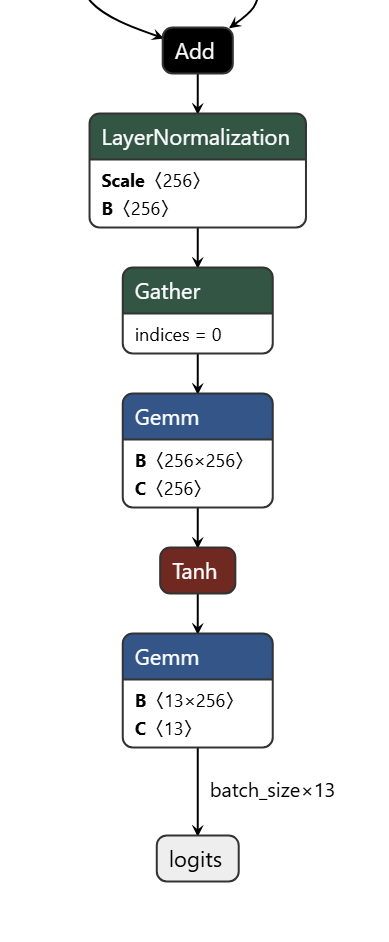
The output also looks correct, we get a logits vector of size num_classes. With that confirmed, we can finally move on to running this ONNX model inside Flutter.
Making a simple Flutter App to Run the Model
Let’s put together a minimal Flutter app that lets us type text and see the predicted emotion using our freshly exported bert_emotion ONNX model.
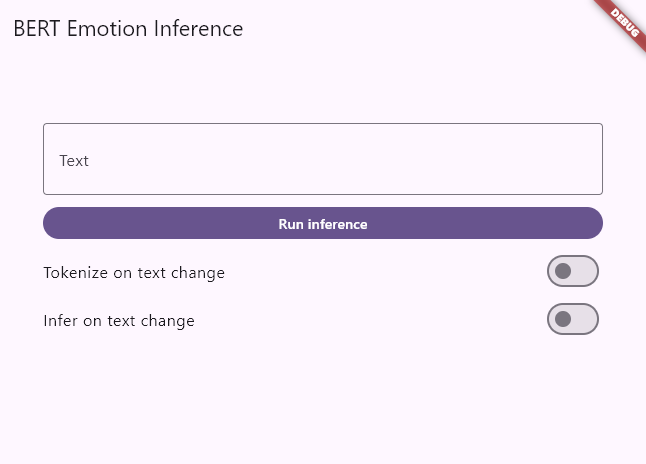
Nothing fancy here: a text field for input, a button to trigger inference, a few toggles for real-time inference while typing, and a simple UI displaying the predicted emotion and its confidence score.
Running Inference with flutter_onnxruntime
Tokenization
To run inference, we first need to tokenize the text exactly as the model was trained. For that, we can use the dart_bert_tokenizer package, which provides a tokenizer compatible with BERT’s WordPiece vocabulary and preprocessing steps.
Let’s look at how to integrate it and prepare the inputs for our ONNX model.
import 'package:dart_bert_tokenizer/dart_bert_tokenizer.dart';

void main() {
  // Load tokenizer
  final tokenizer = WordPieceTokenizer.fromVocabFileSync('vocab.txt');

  // Encode text
  final encoding = tokenizer.encode('Hello, world!');
  print(encoding.tokens); // [[CLS], hello, ,, world, !, [SEP]]
  print(encoding.ids);    // [101, 7592, 1010, 2088, 999, 102]

  // Decode back to text
  final text = tokenizer.decode(encoding.ids, skipSpecialTokens: true);
  print(text); // hello , world !
}
The usage is pretty straightforward: we load the tokenizer with its vocabulary file, encode the input text to obtain token IDs, and, if needed, we can also decode those token IDs back into text. That’s all we need to prepare inputs in the exact same way the original BERT model expects.
Inference
Now that tokenization is in place, we can prepare the input tensors for our ONNX model and run inference using flutter_onnxruntime. The workflow is essentially the same as with the simple addition model, just with bigger tensors and more inputs.
// We encode the text
final encoding = _tokenizer!.encode(text);
// We recover the input ids, attention mask, and token type ids from the encoding
final inputIds = Int64List.fromList(
encoding.ids.map((value) => value.toInt()).toList(),
);
final attentionMask = Int64List.fromList(
encoding.attentionMask.map((value) => value.toInt()).toList(),
);
final tokenTypeIds = Int64List.fromList(
encoding.typeIds.map((value) => value.toInt()).toList(),
);
// We convert the input data to OrtValue tensors
inputIdsTensor = await OrtValue.fromList(inputIds, [1, inputIds.length]);
attentionMaskTensor = await OrtValue.fromList(attentionMask, [
    1,
    attentionMask.length,
]);
tokenTypeIdsTensor = await OrtValue.fromList(tokenTypeIds, [
    1,
    tokenTypeIds.length,
]);

final inputs = <String, OrtValue>{
'input_ids': inputIdsTensor,
'attention_mask': attentionMaskTensor,
'token_type_ids': tokenTypeIdsTensor,
};
// And if we didn't make any mistake, we can run the inference
outputs = await _session!.run(inputs);
Post-processing the Output
Once inference completes, we receive a logits tensor. From there, we simply apply a softmax to compute confidence scores and pick the emotion with the highest probability. That’s our prediction.
// We get the logits output tensor
final logitsTensor = outputs['logits'] ?? outputs.values.first;
final logitsData = await logitsTensor.asFlattenedList();
final logits = logitsData
    .map((value) => (value as num).toDouble())
    .toList();
// We can then apply an argmax to get the predicted class index, and a softmax to get the confidence scores
final predictedIndex = _argmax(logits);
final confidence = _softmax(logits)[predictedIndex];
final emotion = predictedIndex < _labels.length
    ? _labels[predictedIndex]
    : 'label_$predictedIndex';
And just like that, we can display both the predicted emotion and its confidence score directly in our Flutter UI.
Tip: Make sure to clean up/release any input tensors after inference to avoid memory leaks.
Final Demo
Here’s where Flutter really shines: I developed this app on Windows for Android, and thanks to Flutter’s portability, I can run the exact same UI on the web as well. Enjoy!
Note: The web version doesn’t support models using int64 inputs, so this demo uses a version of the model converted to int32 instead.
Future Improvements
- Experiment with quantization to reduce model size and improve inference speed on mobile.
- Design a more journal-like UI to make the app more engaging.
- Fine-tune this model, or a different one, to match a full emotion wheel instead of just 13 classes.
- Add support for int64 tensors in flutter_onnxruntime so the original model can run on the web.
Call to Action
Go checkout the code on GitHub, give the app a try, and feel free to reach out with questions or feedback. I’d love to hear what you build with it!
License
While my code is open source under the MIT License, the bert_emotion model itself is not (Apache 2.0 License).